Beginning of a Journey
During my final year of university, I was fortunate to work in a team with 6 other students tasked to create a Computer Vision startup and develop an MVP for it. We decided to create a mobile app used by bars, clubs and other venues to verify the identity of their customers and gather insights on their customer traffic patterns. During this project, I was selected as the lead for our app’s development (spoiler: I also ended up as the frontend lead).
Tech Choices, Architecture Diagram, Roadmap
We started by selecting our tech stack, drawing up prototypes of our key use cases, sketching out the architecture diagram, planning a roadmap and creating a project kanban board. Early on, we determined that our idea wouldn’t work well as a web app, as accessing the website every time a user wanted to use our service would be too cumbersome. Instead, we opted to build a mobile app. Given my familiarity with React Native, particularly with using Expo to streamline the development process, I successfully advocated for its adoption by the team.
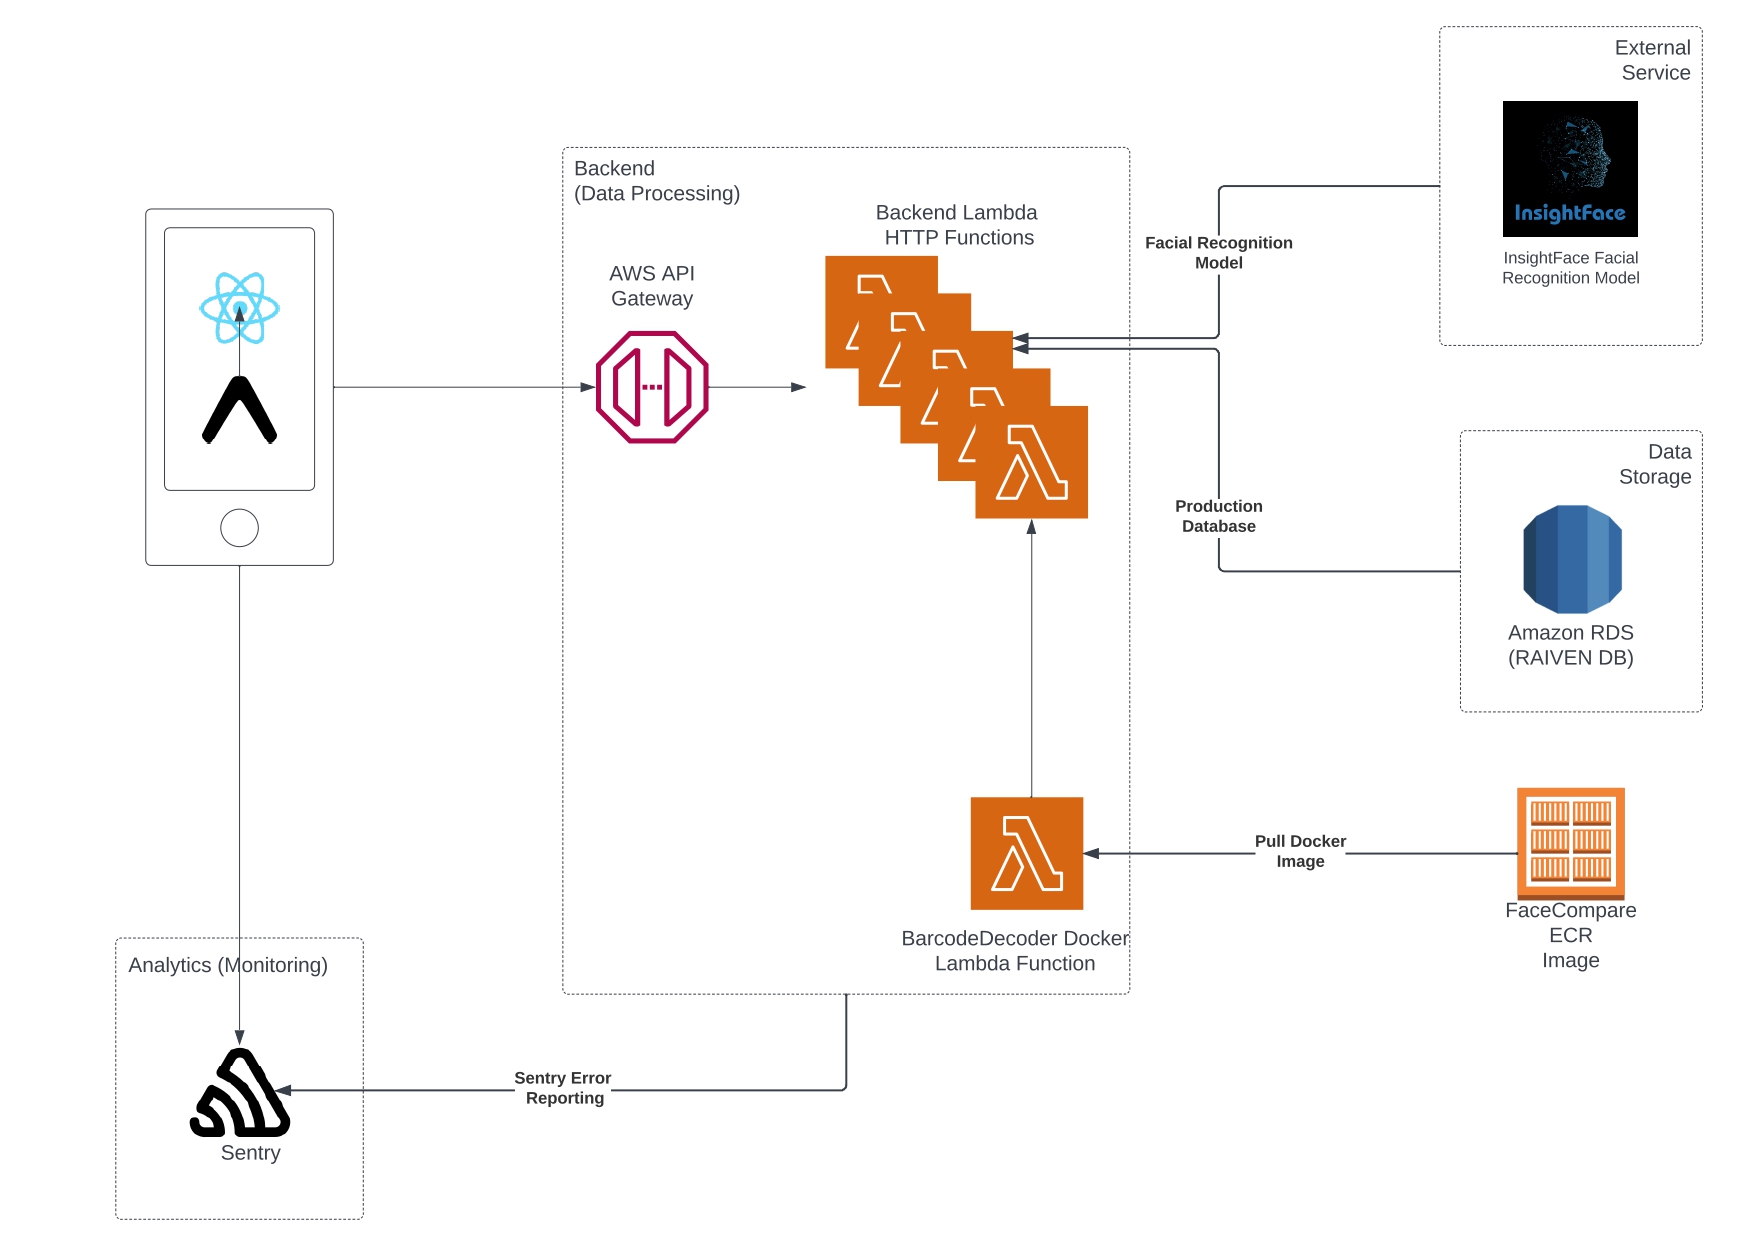
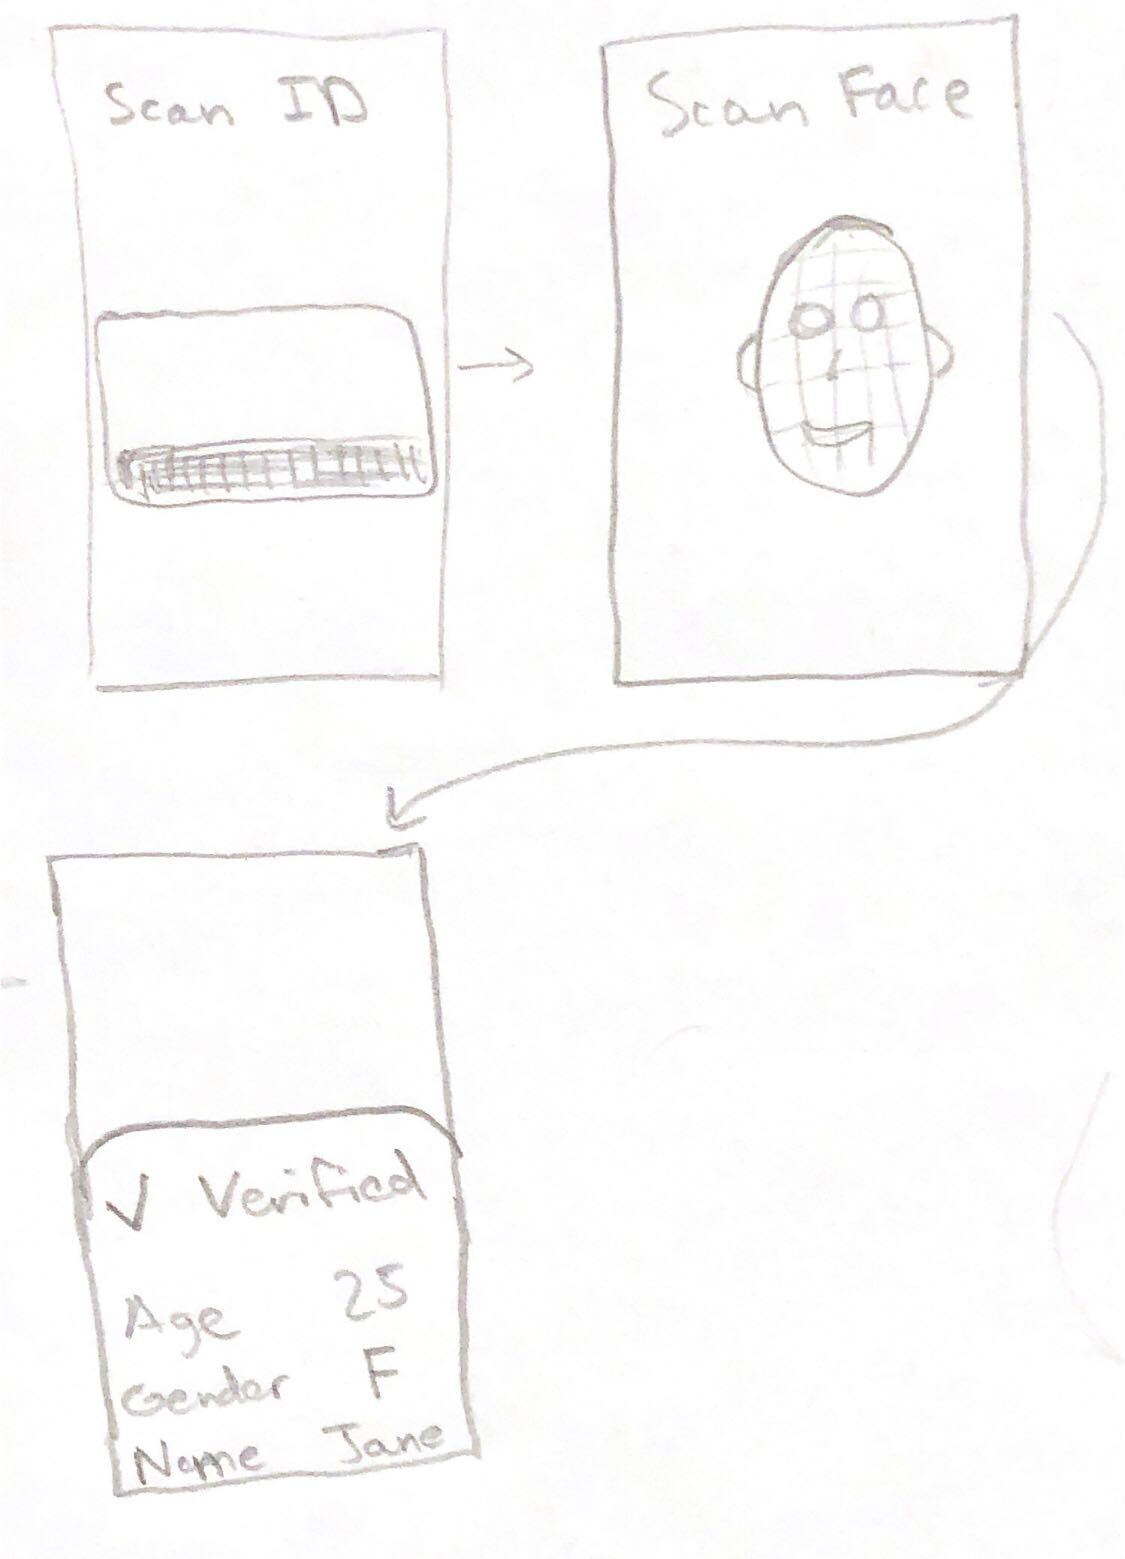
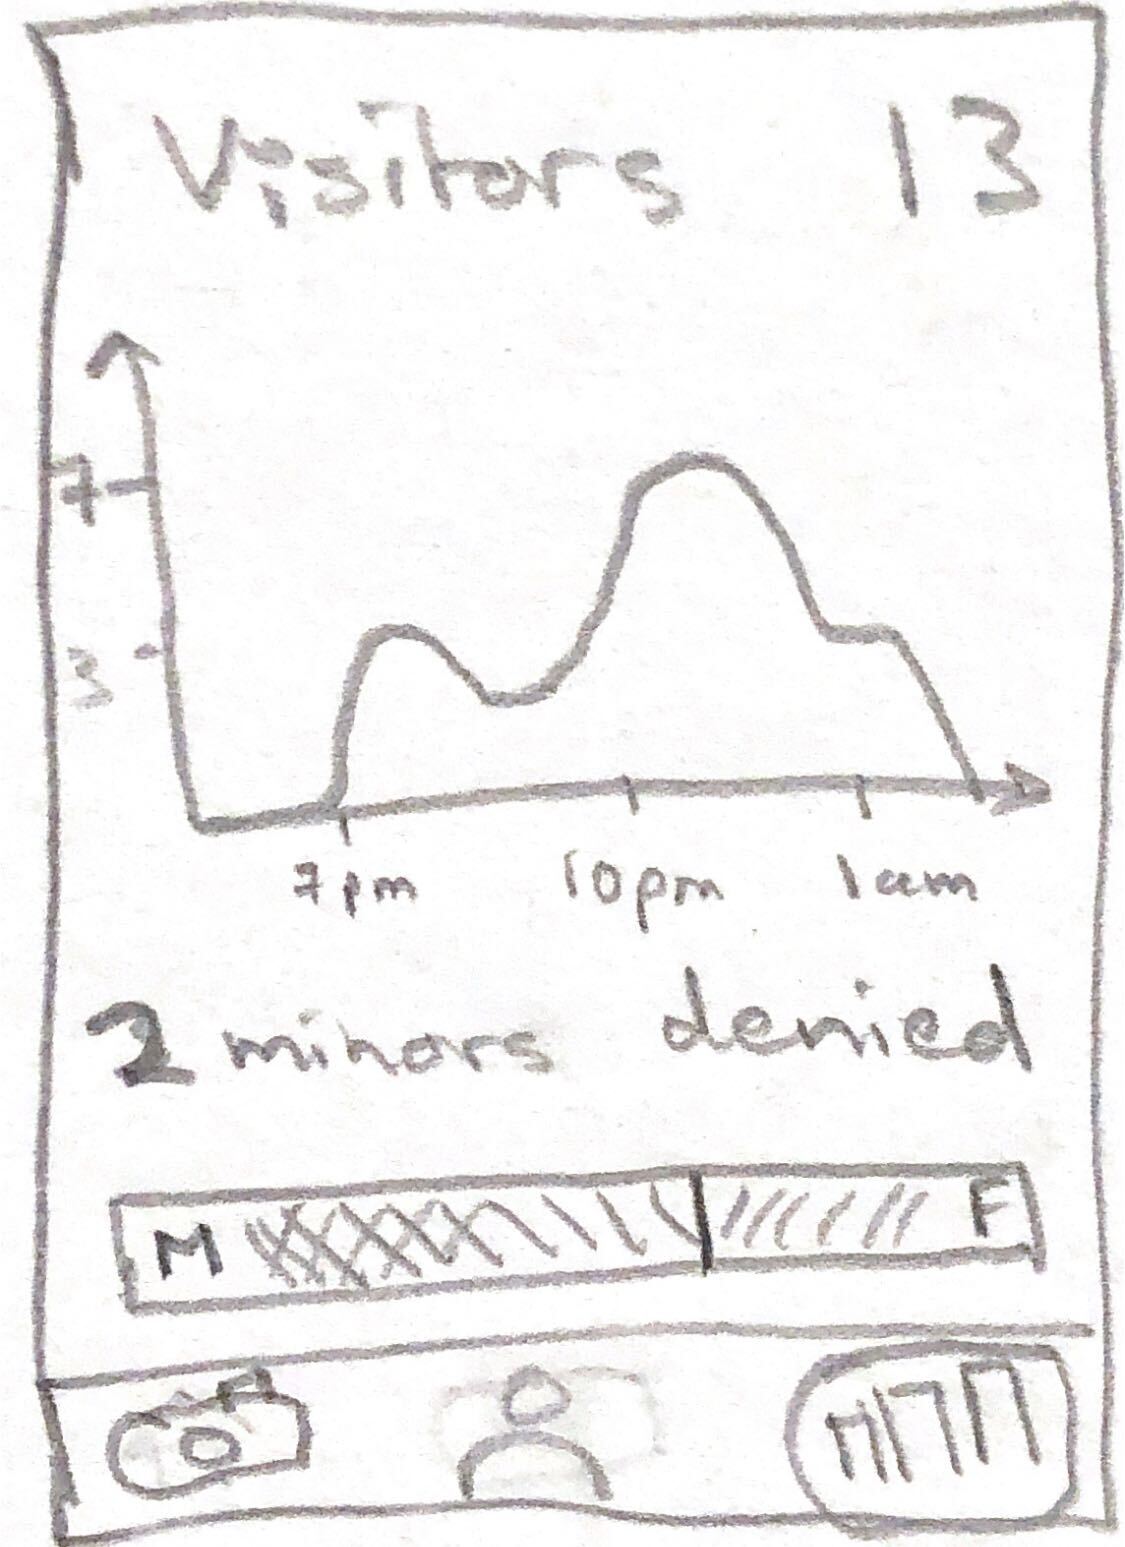
While we developed the use cases as a team, I took the lead in sketching out the user flows and prototypes. This allowed me to apply and refine the paper prototyping skills I had learned in my Interactive Computational Media Design course (CSC318) the previous year. We ultimately decided on the following set of use cases:
Use Case 1
Scan Ontario driver’s license ID barcode and extract data from the barcode. Compare face on ID to person’s face and determine if they are the same person.
Use Case 2
Organization administrators can configure additional criteria for validating ID scans, including minimum age and gender ratio.
Use Case 3
Login to the app with an administrator account to view business analytics including: number of people scanned, a graph of scans during a specified time period, and statistics on demographics including age and gender.
Use Case 4
Login to the app with an administrator account, prompt an email address to create a “basic” account, allowing that user to scan IDs for the administrator’s organization.
User Research
Before we could continue, we had to design a mockup of our app in Figma. Having previously worked on app mockups, I took charge by outlining all the screens we needed in our 4 use cases before we began designing. We also simplified the process by using various UI building blocks from community templates. Once we finished with the interface, we connected all the relevant screens and buttons together to be able to execute all the desired flows.
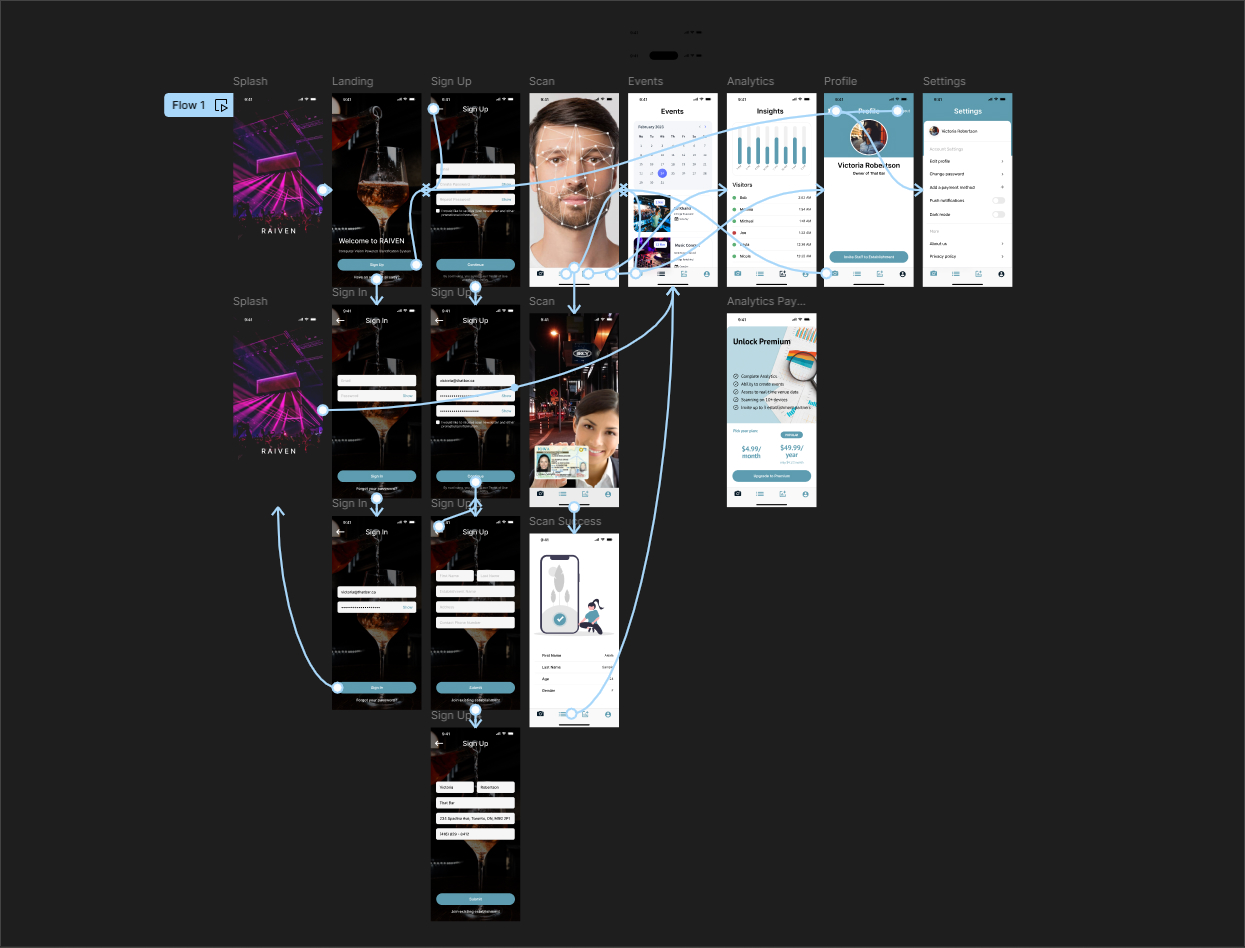
To gather feedback from users, we conducted interviews with course instructors and industry professionals. We developed an interview plan that included tasks for participants to complete using the Figma mockup of our app, along with questions about the accessibility of information the user wants to have during these tasks and their overall experience and thoughts on the app. After the interviews, we reflected on the feedback and summarized our findings, which provided valuable insights to guide our next steps and ensure we were moving in the right direction.
Development
When it came time to start developing the app, we had a clear idea of what we needed to make thanks to the mockup. But we also had several technical requirements that needed to be met:
- All user flows need to be executable in the app
- We needed to create the necessary tooling to bootstrap, test, and run our project
- We needed to ensure any encountered issues were recorded in an error reporting system
- We needed to set up a CI pipeline to automate linting, formatting, type checking, and unit testing (including code coverage)
As the experienced member of the team, I took the responsibility of initializing the environment and creating any necessary tooling. I set up an Expo app and wrote instructions on how to use Expo Go to test the app on a smartphone. While I was working on the rest of the tooling, I let my peers start implementing screens in the app.
I wrote a bash script to bootstrap the development environment, which included installing Node.js using NVM, Yarn Classic as our package manager, and the dependencies specified in the committed lockfile. I also wrote a bash script to run the tests using Jest and React Testing Library.
I set up the CI pipeline on GitHub Actions to automate all the aforementioned tasks using a YAML script. The script runs ESLint, Prettier, Jest, and the TypeScript checker.
Finally, I created a Sentry account and installed it into our Expo app to track any errors that users might encounter.
Finishing the MVP
The rest of the development process went smoothly. We were a bit behind schedule initially, but managed to finish an MVP in time for the deadline. A few notable libraries we chose to use were TanStack Query to help managing data fetching and mutations, React Hook Form to handle form input and submission, and Zod to validate the data and responses received from the backend.
During the late stages of development, we realized we needed the ability to generate links for users to join an establishment and redirect to our app. I quickly initialized a Next.js project and created a route to handle sending the POST request to the backend and redirecting the user to the app using universal links.
Conclusion
Our final product was a fully functional MVP that met the goals we initially set out to achieve. If you would like to see the app in action, you can watch this demo video prepared by the team.
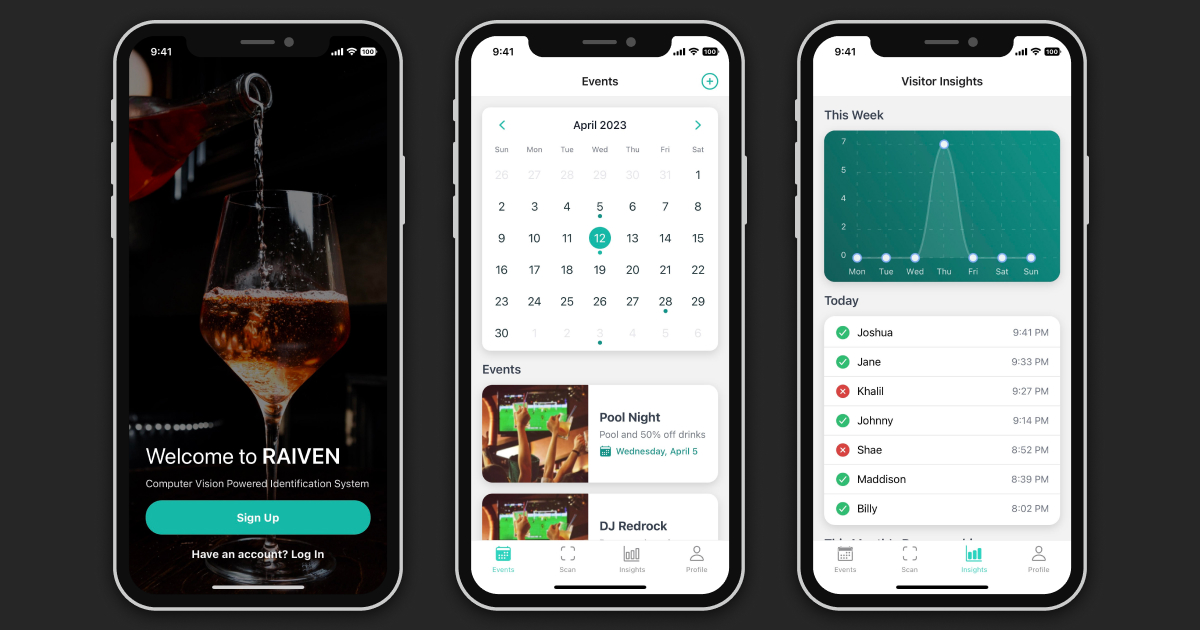
The app included authentication features, allowing users to sign up for new accounts and log into existing ones. An establishment owner could invite an employee by providing a QR code that they can scan, open our Next.js app, and be redirected to the mobile app as an authenticated user. Once logged in, users had access to four main screens: Events, Scan, Insights, and Profile.
On the Events screen, users could view a calendar with marked event dates and a list of these events displayed below. The plus button in the top right opens a popup where users can create an event by filling out the event title, description, minimum age, and max gender ratio fields. The popup also included one date and two time pickers for specifying the event’s schedule. Once an event was created, the user was redirected back to the Events page, where the newly created event would appear in its appropriate spot, sorted by date.
The Insights screen provided an option to upgrade to a premium version, which would allow users to view historical demographics. The Profile screen displayed the user’s details and allowed for edits. Lastly, the Scan screen enabled the user to first take a photo of a customer’s face, then the front and back of their ID card (demo implemented only for Ontario driver’s licenses). Upon completion a result screen was displayed, showing the customer’s information.
What’s next?
The biggest challenge such a product would face in gaining public adoption is the privacy implications of storing visitor data and managing access to scans containing sensitive information, not to mention the potential use of this data to track individuals and their habits. Although it’s technically possible to design software that securely processes and deletes such data after use, users would have no way to verify the validity of these privacy claims until a data breach occurs. Due to these concerns, we chose not to continue the project beyond the course. However, the experience was immensely valuable, particularly as it was my first time working with Computer Vision to implement facial recognition and barcode scanning.